.png "image-(29)")

While generally left for our padding department professionals, many of our customers and end users actually opt to perform their own custom cut-outs on their newly-ordered wall padding. In the event of forgotten electrical switches, altering existing padding is a very viable option for many and not terribly difficult to undertake.
The name of the game is patience. As with any custom work, slow and steady typically wins the race and in this case, saves you from having to order additional pads or replacement vinyl for improperly cut holes. As many contractors will tell you, measure twice, cut once.
What You Need
The tools for the job are literally ones most of us could even find in our own homes. Below is a list of everything you will need to complete your own custom padding cut-outs:
- Drill
- Jigsaw (with a short blade, 2.5” or shorter)
- X-Acto Utility Knife
- Ruler and/or Measuring Tape
- Adhesive
- Staple Gun
Step By Step
- Initially you will want to determine the prospective cut-out location on the pad. Start by measuring to the centre from the pad edge and measure the bottom distance using the electrical outlet, or whatever object you are planning to expose.
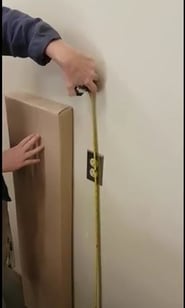
- Next, lay your pad, vinyl down, on a work bench or table and using a pencil, mark the pad back to the centre location and verify the exact size of the cut-out before transferring your measurements to the back of the pad.
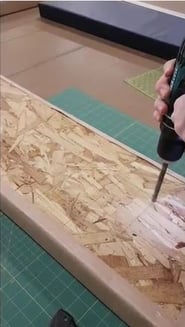
- Using a straight edge, mark the square on the back of the pad, but be sure to allow for roughly 1/8” access point for your drill holes. Once marked, proceed to drill four holes in each corner of your marked area to allow for jigsaw access.
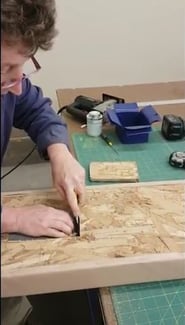
- Start with the jigsaw blade in one of the access points and slowly and carefully cut the shape out of the padding. Make sure your blade does not pierce the vinyl!
- Once cuts are completed, carefully remove the cut wood portion on the back of your padding and remove the foam, carefully slicing if necessary.
- Check again to ensure vinyl is still intact before dropping in your vinyl insert. Make sure it is flat and fits comfortably within the corners of your cut-out. Use a pencil to draw an “X” through the cut-out and then carefully follow your markings with an X-Acto knife, separating the vinyl.
- Fold up each corner of the cut vinyl, and apply adhesive to both areas of vinyl. Depending on the adhesive, give it a couple of minutes to allow it to tack up, and then fold and secure the vinyl.

- Finish the job by stapling the flaps to the plywood and install.
Watch the Step-By-Step Video Below: